GTK is the Gnome desktop graphics library first developed for Gimp, the GNU Image Manipulation Program. The GTK libraries were packaged into a Python GUI library known as PyGTK. These libraries closely resemble the capabilities of the GTK "C" libraries.
Alternative GUI development libraries exist for Python including those based on VW_windows, Qt and the Tk tool kit.
Python and PyGTK are typically native packages on Linux and are easily installed on MS/Windows as MSI installations.
Linux: (example RHEL6/CentOS 6)- python (native package: 2.6.5)
- pygtk2 (native package: 2.16.0)
- python2.7 (native package: 2.7.1)
- python-gtk2 (native package: 2.22.0)
- python2.5 (native package: 2.5.2)
- python-gtk2 (native package: 2.13.0)
- python: http://www.python.org/download/
msi install: http://python.org/ftp/python/2.7.3/python-2.7.3.msi
(Be sure to add C:\Python27\ folder to the PATH to pick up python.exe) - PyGTK: http://www.pygtk.org/downloads.html 32 bit all in one installer
http://ftp.gnome.org/pub/GNOME/binaries/win32/pygtk/2.22/pygtk-all-in-one-2.22.6.win32-py2.7.msi
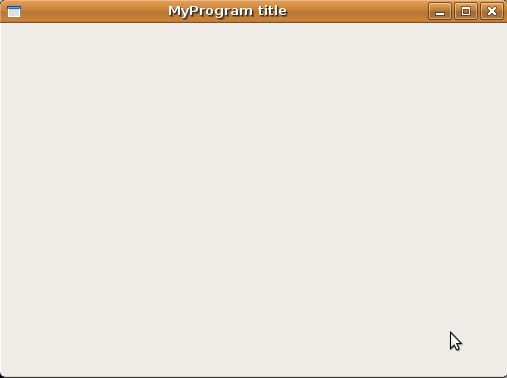
All pyGTK layouts are organized in a tree structure with the root of the tree being the main display window.
GUI Window:
gtk.Window(type=gtk.WINDOW_TOPLEVEL)Options:
- set_title(title)
- set_position(position)
- set_focus(focus)
- set_default(default_widget)
- set_resizable(resizable)
- ...
#!/usr/bin/env python

import pygtk
pygtk.require('2.0')
import gtk

class MyProgram:

    def __init__(self):

        # create a new window

        app_window = gtk.Window(gtk.WINDOW_TOPLEVEL)
        app_window.set_size_request(500, 350)
        app_window.set_border_width(10)
        app_window.set_title("MyProgram title")
        app_window.connect("delete_event", lambda w,e: gtk.main_quit())

        # Program goes here  ...

        app_window.show()

        return

def main():
    gtk.main()
    return 0

if __name__ == "__main__":
    MyProgram()
    main()
GUI Layout:
In order to layout graphics, display test, display text entry boxes and other GUI widgets one can use a network of horizontal or vertical layout widgets. If laying out widgets in two dimensions one can use a table of horizontal and vertical rows and collumns.- Horizontal boxes
gtk.HBox(homogeneous=False, spacing=0)- homogeneous: True = equal space allocations for al child objects.
- spacing: The additional horizontal space between child objects in pixels
- Vertical Boxes
gtk.VBox(homogeneous=False, spacing=0)- homogeneous: True = equal space allocations for al child objects.
- spacing: The additional vertical space between child objects in pixels
- Table
gtk.Table(rows=4, columns=3, homogeneous=False)- homogeneous: True = equal space allocations for al child objects.
- rows: number of rows
- columns: number of columns
- resize(rows, columns)
- set_row_spacing(row, spacing)
- set_column_spacing(column, spacing)
- attach(child, left_attach, right_attach, top_attach, bottom_attach, xoptions=gtk.EXPAND|gtk.FILL, yoptions=gtk.EXPAND|gtk.FILL, xpadding=0, ypadding=0)
- ...
The following uses HBox(), VBox() and Table() to layout text and button widgets in the display window:
#!/usr/bin/env python

import pygtk
pygtk.require('2.0')
import gtk

class MyProgram:

    def __init__(self):

        # create a new window

        app_window = gtk.Window(gtk.WINDOW_TOPLEVEL)
        app_window.set_size_request(500, 350)
        app_window.set_border_width(10)
        app_window.set_title("MyProgram title")
        app_window.connect("delete_event", lambda w,e: gtk.main_quit())

        vbox_app = gtk.VBox(False, 0)
        app_window.add(vbox_app)
        vbox_app.show()

        label_app = gtk.Label("Application name: ")
        label_app.show()
        vbox_app.pack_start(label_app, False, False, 6)

        # Draw Table() to layout text:

        table_layout = gtk.Table(rows=2, columns=2, homogeneous=True)
        label_a = gtk.Label("AAA")
        label_a.show()
        table_layout.attach(label_a, 0, 1, 0, 1, 0,0,0,0)
        label_b = gtk.Label("BBB")
        label_b.show()
        table_layout.attach(label_b, 0, 1, 1, 2, 0,0,0,0)
        label_c = gtk.Label("CCC")
        label_c.show()
        table_layout.attach(label_c, 1, 2, 0, 1, 0,0,0,0)
        label_d = gtk.Label("DDD")
        label_d.show()
        table_layout.attach(label_d, 1, 2, 1, 2, 0,0,0,0)
        table_layout.show()
        vbox_app.add(table_layout)

        # Use HBox() to layout text and button next to each other:

        hbox_close = gtk.HBox(False, 0)
        label_close = gtk.Label("Close aplication: ")
        hbox_close.pack_start(label_close, True, True, 0)
        label_close.show()

        button_close = gtk.Button(stock=gtk.STOCK_CLOSE)
        button_close.connect("clicked", lambda w: gtk.main_quit())
        button_close.set_flags(gtk.CAN_DEFAULT)
        hbox_close.pack_start(button_close, True, True, 0)
        button_close.show()

        hbox_close.show()
        vbox_app.add(hbox_close)

        # Place after association to hbox/vbox to avoid the following error:
        # GtkWarning: gtkwidget.c:5460: widget not within a GtkWindow
        button_close.grab_default()

        app_window.show()

        return

def main():
    gtk.main()
    return 0

if __name__ == "__main__":
    MyProgram()
    main()

Button widgets provide a mechanism to provide functionality for the user action of selecting the button. Thus the programmer must provide a Python callback function to be executed when the button is pressed.
gtk.Button(label=None, stock=None, use_underline=True)
Options:
- set_label(label)
- set_relief(newstyle)
- set_alignment(xalign, yalign)
- set_image(image)
- set_image_position(position)
- ...
    ...
    ...

    hbox_buttons = gtk.HBox(False, 0)

    button_a = gtk.Button("Execute process A")
    button_a_data = (arg_1, arg_2, arg_3, arg_4)
    button_a.connect("clicked", self.button_a_callback, button_a_data)
    button_a.set_flags(gtk.CAN_DEFAULT)

    hbox_buttons.pack_start(button_a, True, True, 0)
    button_a.show()

    ...
    ...
Callback function to execute if button is pressed:
    def button_a_callback(self, widget, data_a):

    # function arguments
    first_fn_arg  = data_a[0]
    second_fn_arg = data_a[1]
    third_fn_arg  = data_a[2]
    fourth_fn_arg = data_a[3]

    # process data
    ...
    ...

    return
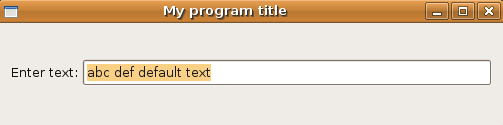
Text entry widgets require a callback function to manage and receive the text.
In this example we have a callback (callback enter_callback_b()) defined by the programmer when the widget is defined and the callback assigned to the widget by the call to the "connect" function call: entry_b.connect("changed", self.enter_callback_b, entry_b).
Note that the callback is called initially when the default text is assigned and every time the text entry is changed.
In this example we also added a label to display the intent of the text entry box to the user. A default entry is also assigned.
The variable entry_text_b can be passed to the location in the code where it is to be used but also can be assigned to a global variable.
gtk.Entry(gtk.Widget, gtk.Editable, gtk.CellEditable)gtk.Entry(max=0)
Options:
- set_has_frame(setting)
- set_max_length(max) : max string length alowed to be enetered. Set to "0" for upper limit (65536).
- set_width_chars(n_chars) : width of the text entry box
- set_text(text) : Set the default text entry
- set_alignment(xalign)
- set_overwrite_mode(overwrite)
- ...
#!/usr/bin/env python
import pygtk
pygtk.require('2.0')
import gtk

class TextEntry:

    def enter_callback_b(self, widget, entry_b):
        entry_text_b = entry_b.get_text()
        print "Text entry: %s\n" % entry_text_b
        return

    # Main program to draw GUI
    def __init__(self):

        # create a new window
        app_window = gtk.Window(gtk.WINDOW_TOPLEVEL)
        app_window.set_size_request(500, 100)
        app_window.set_border_width(10)
        app_window.set_title("My program title")
        app_window.connect("delete_event", lambda w,e: gtk.main_quit())

        # Set default text in text entry box
        entry_checker_default_b = "abc def default text"

        # Text label
        hbox_b = gtk.HBox(False, 0)
        app_window.add(hbox_b) # attach HBox to window
        label_b = gtk.Label("Enter text: ")
        label_b.show()
        hbox_b.pack_start(label_b, False, False, 0)

        # Generate text entry box
        entry_b = gtk.Entry()
        entry_b.set_max_length(80)
        entry_b.set_width_chars(50)
        entry_b.connect("changed", self.enter_callback_b, entry_b)
        entry_b.set_text(entry_checker_default_b)
        entry_b.select_region(0, len(entry_b.get_text()))
        entry_b.show()
        hbox_b.pack_start(entry_b, False, False, 0)

        hbox_b.show()
        app_window.show()
        return

def main():
    gtk.main()
    return 0

if __name__ == "__main__":
    TextEntry()
    main()
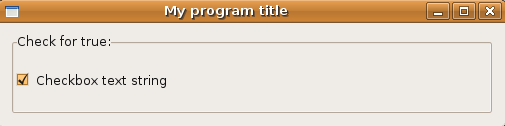
The check box/button is a typical GTK widget which requires a callback function which is assigned to the widget. In this example we use a frame widget to generate a visual frame to encapsulate the displayed widget. In addition we used a global variable to pass the variable around to potential functions which could use the variable.
gtk.CheckButton(label=None, use_underline=True)- label : String to be used as a text label
- use_underline : True=underscore in the text label indicates "alt" accelerator key
#!/usr/bin/env python

import pygtk
pygtk.require('2.0')
import gtk

# Global variables
b_entry_checkbox = True

class Checkbox:

    def entry_checkbox(self, widget, checkbox):
        global b_entry_checkbox
        b_entry_checkbox = checkbox.get_active()
        if b_entry_checkbox:
            print "Box checked"
        else:
            print "Not checked"
        return

    # Main program to draw GUI
    def __init__(self):
        global b_entry_checkbox

        # create a new window
        app_window = gtk.Window(gtk.WINDOW_TOPLEVEL)
        app_window.set_size_request(500, 100)
        app_window.set_border_width(10)
        app_window.set_title("My program title")
        app_window.connect("delete_event", lambda w,e: gtk.main_quit())

        frame_checkbox = gtk.Frame("Check for true:")
        frame_checkbox.set_shadow_type(gtk.SHADOW_IN)

        app_window.add(frame_checkbox)

        check_box = gtk.CheckButton("Checkbox text string")
        check_box.connect("toggled", self.entry_checkbox, check_box)
        check_box.set_active(True)  # Set the defaut
        check_box.show()

        frame_checkbox.add(check_box)
        frame_checkbox.show()
        app_window.show()
        return

def main():
    gtk.main()
    return 0

if __name__ == "__main__":
    Checkbox()
    main()
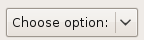
Combo boxes allow for a selection of assigned options. Like all other widgets, it must be assigned to a layout widget to be displayed.
gtk.ComboBox(model=None)gtk.combo_box_new_text()
Options:
- set_entry_text_column(text_column)
- set_wrap_width(width)
- set_active(index)
- append_text(text)
- ...
...
...
        global g_combo_selected
...
...
        combo_box = gtk.combo_box_new_text()
        combo_box.append_text("Choose option:")
        combo_box.append_text("option-a")
        combo_box.append_text("option-b")
        combo_box.append_text("option-c")
        combo_box.append_text("option-d")
        combo_box.connect('changed', self.combo_select_callback)
        combo_box.set_active(0)  # set the default option to be shown
        combo_box.show()

...
...
Combo box callback:
    def combo_select_callback(self, widget):
        global g_combo_selected
        model = widget.get_model()
        index = widget.get_active()
        if index:
            print 'Option selected: ',  model[index][0]
            g_combo_selected = model[index][0]
        if g_checker_selected == "Choose option:":
            print "Error! Choose an option"
        return
Other combo box types include:
- gtk.Combo
- gtk.ComboBoxEntry
- gtk.ComboBoxText
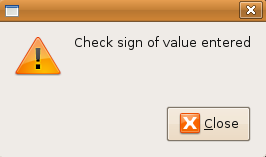
The dialog box presents a pop-up message box to inform the application user.
gtk.MessageDialog(parent=None, flags=0, type=gtk.MESSAGE_INFO, buttons=gtk.BUTTONS_NONE, message_format=None)- flags : gtk.DIALOG_MODAL, gtk.DIALOG_DESTROY_WITH_PARENT or 0 for no flags. Can be combined.
- type: The pyGTK libraries provides default message box symbology for the following purposes:
- Error message: gtk.MESSAGE_ERROR
- Warning message: gtk.MESSAGE_WARNING
- Information message: gtk.MESSAGE_INFO
- Question message: gtk.MESSAGE_QUESTION
- buttons:
- gtk.BUTTONS_NONE
- gtk.BUTTONS_OK
- gtk.BUTTONS_CLOSE
- gtk.BUTTONS_CANCEL
- gtk.BUTTONS_YES_NO
- gtk.BUTTONS_OK_CANCEL
- message format: string containing the message text or None
- set_markup(str)
- set_image(image)
- ...
Information message dialog:
    # Print dialog box to inform user
    message_for_user = "Check sign of value entered"
    md = gtk.MessageDialog(app_window,
                           gtk.DIALOG_DESTROY_WITH_PARENT,
                           gtk.MESSAGE_INFO,
                           gtk.BUTTONS_CLOSE,
                           message_for_user)
    md.run()
    md.destroy()
Note that the variable "md" is not attached to a layout widget or any other entity in the application. It is not required to "show()" the widget either. It stands alone and can be placed anywhere in the code as a mechanism to present a message to the user.
 |
 |
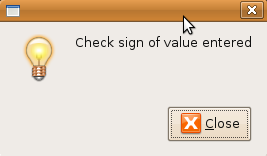 |
| gtk.MESSAGE_ERROR | gtk.MESSAGE_WARNING | gtk.MESSAGE_INFO |
The following code snippet shows how to embed and display an X Pixmap image (XPM) within a Python pyGTK script. Any bitmap image (gif, jpeg, etc) can be converted to an "xpm" file using image manipulation software such as XV or Gimp and performing a "Save as ...".
XPM is a "C" text string representation of a color bit mapped image. Graphic software conversion typically prepares the XPM in this mode to be embedded into "C" programs. Only minor changes are required to use the XPM image in a Python/pyGTK script. It must be changed from a "C" char to a Python string.
The original native XPM image file:
static char * YoLinux_logo_xpm[] = {
"186 176 4613 2",
"       c None",
".      c #000000",
"+      c #161616",
"@      c #121212",
"#      c #010101",
"$      c #0C0C0C",
"%      c #060606",
"&      c #070707",

..
...

"                   . L@M@S@T@U@V@W@X@Y@Z@`@ #.#+#@###$#%#&#*#=#-#;#>#,#'#)#!#~#{#]#^#/#(#_#:#:#<#[#}#.   ",
"                  |#1#2#8#9#0#a#b#c#d#: e#f#g#h#i#. . j#k#l#m#n#o#p#q#r#. s#t#u#v#w#x#y#z#,.A#B#C#D#E#%  ",
"                F#G#H#I#N#a 1+, O#>+P#Q#R#S#T#U#V#W#X#Y#Z#`# $.$+$@$#$$$%$&$*$=$-$;$>$,$'$)$!$~${$]$^$/$ ",
"                        P#O ,*'*)*!*H&~*{*9 ]*,%^*/*(*_*:*<*[*}*|*1*2*3*4*5*6*7*8*9*0*a*b*c*d*e*f*g*h*i* ",
"              . . .     $ p*,*q*'*r*W@D$s*t*u*v*w*x*y*z*A*B*C*D*E*F*|*G*H*I*1*J*K*L*M*N*O*P*Q*R*Q*S*T*U* ",

...
...

"                                                                                                                             "};
Convert native XPM "C" string to a Python string:
YoLinux_logo_xpm [
"186 176 4613 2",
"       c None",
".      c #000000",
"+      c #161616",
"@      c #121212",
"#      c #010101",
"$      c #0C0C0C",
"%      c #060606",
"&      c #070707",

..
...

"                   . L@M@S@T@U@V@W@X@Y@Z@`@ #.#+#@###$#%#&#*#=#-#;#>#,#'#)#!#~#{#]#^#/#(#_#:#:#<#[#}#.   ",
"                  |#1#2#8#9#0#a#b#c#d#: e#f#g#h#i#. . j#k#l#m#n#o#p#q#r#. s#t#u#v#w#x#y#z#,.A#B#C#D#E#%  ",
"                F#G#H#I#N#a 1+, O#>+P#Q#R#S#T#U#V#W#X#Y#Z#`# $.$+$@$#$$$%$&$*$=$-$;$>$,$'$)$!$~${$]$^$/$ ",
"                        P#O ,*'*)*!*H&~*{*9 ]*,%^*/*(*_*:*<*[*}*|*1*2*3*4*5*6*7*8*9*0*a*b*c*d*e*f*g*h*i* ",
"              . . .     $ p*,*q*'*r*W@D$s*t*u*v*w*x*y*z*A*B*C*D*E*F*|*G*H*I*1*J*K*L*M*N*O*P*Q*R*Q*S*T*U* ",

...
...

"                                                                                                                             "]
Code to display XPM:
 ...
 ...
        # Convert XPM image (list of strings) to GTK pixbuf
        logo_pixbuf = gtk.gdk.pixbuf_new_from_xpm_data(YoLinux_logo_xpm)
        logo = gtk.Image()
        # convert pixbuf to GTK image
        logo.set_from_pixbuf(logo_pixbuf)
        logo.show()
 ...
 ...
- Lots of other pyGTK widgets are avaialable including:
- progress bar: gtk.ProgressBar()
(Progress defined as 0 to 1. Widget also displays text messages.) - About pop-up: gtk.AboutDialog()
- Arrow: gtk.Arrow()
- Date selection: gtk.Calendar()
- Cells: gtk.CellEditable(), gtk.CellLayout(), gtk.CellRenderer(), ...
- Clipboard: gtk.Clipboard()
- Menus: gtk.Menu(), gtk.MenuBar(), gtk.MenuItem(), gtk.MenuShell(), ...
- ...
- progress bar: gtk.ProgressBar()
- Programatically one can change the display of widgets:
- Turn off: widget_name.hide()
- Turn on: widget_name.show()
- Log files are helpful:
import os import sys import time import datetime def f_abc(): # Open log file logFile = open("AppLog.txt","w") now = datetime.datetime.now() current_time= now.strftime("%Y-%m-%d %H:%M") logFile.write("Application run: " + current_time+"\n") ... ... logFile.write(str_a + "\n") ... ... logFile.write("Run complete!\n") logFile.close() return - PyGTK is cross platform. Keep your Python program cross platform as well:
It is very helpful to use os.sep as it avoids editor syntax highlighting errors with "\t" (tab), "\a", "\b", etc with DOS style file paths.
import os

        ...
        ...

        if os.name == "posix":
            command_purge = "rm -Rf /tmp" + os.sep + intermediate_dir
        elif os.name == "nt":
            command_purge = "DEL /Q C:" + os.sep + intermediate_dir

        ...
        ...
Links:
 Books:
 |
Core Python Programming (2nd edition)
by Wesley Chun ISBN #0132269937, Prentice Hall It has 1136 pages of comprehensive information. It has detailed information. Good for both learning and reference. You won't need another book. |

|
 |
Core Python Applications Programming (3rd edition)
by Wesley Chun ISBN #0132678209, Prentice Hall It has 888 pages of examples and advanced development topics. This book is for those who already know Python. |
|
 |
Python Essential Reference (4th edition)
by David Beazley ISBN #0672329786, Addison-Wesley Fourth edition. Authoritative reference for both the Python language and Python library. |
|
 |
Python pocket reference
by Mark Lutz ISBN #0596158084, O'Reilly Media (Oct 2009)
|
|
 |
Python Coobook
by Alex Martinelli, Anna Ravenscroft, David Ascher ISBN #0596007973, O'Reilly Media Loads of examples for various tasks both simple and complex. Over 200 recipes. |
|