Jenkins can monitor your CM system to detect a check-in. Upon recognition of this change, Jenkins will update a local working directory of code and perform a series of build steps (e.g. "ant clean", "ant compile" or "make clean" and "make"). Unit tests and tests can be performed after each build. Jenkins can support multiple CM systems (SVN, CVS, GIT, Clearcase, ...) and build frameworks. It can work as a stand-alone server or collectively in a master with multiple reporting nodes configuration to support builds on a variety of OS's and configurations. Jenkins supports Ant, Maven or a sequence of shell script based builds, code analysis and unit or integration tests. Jenkins has many plug-ins available to extend its feature set and to integrate with other Software tools.
This tutorial will cover the installation, configuration and use of Jenkins integrated with an existing Apache server used as a CM web portal.
Other related YoLinux.com Tutorials:

Download:
- Jenkins: Jenkins web site.
Two example installations:
- Basic WAR file and start script
- Linux RPM Package (Red Hat/Fedora/CentOS)
This example shows the basic Unix/Linux start script used to launch Jenkins. All configuration options in this example are set with environment variables and command line arguments:
#!/bin/bash

# Umask set so all in developer group can access and debug Jenkins jobs.
# Assign user jenkins to be in the developer group.
umask 002

export JENKINS_HOME=/var/jenkins
export JENKINS_USER="jenkins"
export JAVA_HOME=/usr/java/latest
export CLASSPATH=$JAVA_HOME/lib/tools.jar:./
export ANT_HOME=/opt/apache-ant-1.8.1
export PATH=$JAVA_HOME/bin:$ANT_HOME/bin:$PATH
export JENKINS_PORT="8080"
export JENKINS_AJP_PORT="8009"
export JENKINS_DEBUG_LEVEL="5"
export JENKINS_ENABLE_ACCESS_LOG="yes"
export JENKINS_HANDLER_MAX="10"
export JENKINS_HANDLER_IDLE="20"

java -Djava.awt.headless=true -DJENKINS_HOME=$JENKINS_HOME -jar $JENKINS_HOME/jenkins.war --accessLoggerClassName=winstone.accesslog.SimpleAccessLogger --simpleAccessLogger.format=combined --simpleAccessLogger.file=$JENKINS_HOME/logs/access_log --prefix=/jenkins --daemon
or access with the "/jenkins/" path appended to the URL http://localhost:8080/jenkins/
Jenkins is available as source, pre-built binaries and as an installation package.
Jenkins RPM Installation: rpm -ivh jenkins-1.487-1.1.noarch.rpm
/etc/init.d/jenkins
/etc/logrotate.d/jenkins
/etc/sysconfig/jenkins
/etc/yum.repos.d/jenkins.repo
/usr/lib/jenkins
/usr/lib/jenkins/jenkins.war
/usr/sbin/rcjenkins
/var/cache/jenkins
/var/lib/jenkins
/var/log/jenkins
Edit the init script: /etc/init.d/jenkins
Add the Java JRE path to line below (line 68):for candidate in /usr/java/latest/bin/java /usr/lib/jvm/java-1.6.0/bin/java ...
See the YoLinux Java installation tutorial for more information.
Edit settings in /etc/sysconfig/jenkins
Define variables used by Jenkins init script.JENKINS_HOME="/var/lib/Jenkins" JENKINS_JAVA_CMD="/usr/java/latest/bin/java" JENKINS_USER="jenkins" JENKINS_JAVA_OPTIONS="-Djava.awt.headless=true" JENKINS_PORT="8080" JENKINS_AJP_PORT="8009" JENKINS_DEBUG_LEVEL="5" JENKINS_ENABLE_ACCESS_LOG="yes" JENKINS_HANDLER_MAX="100" JENKINS_HANDLER_IDLE="20" JENKINS_ARGS="" ...JENKINS_HOME can be specified anywhere you like on the file system (eg: /opt/BUILDS/Jenkins)
An RPM installation will generate the user "jenkins".
A binary installation of Jenkins requires that you create the user:
useradd -d /var/lib/jenkins -c 'Jenkins user' jenkins.
chown -R jenkins.jenkins /var/lib/jenkins
Start Jenkins: /etc/init.d/jenkins start (or service jenkins start)
Note default service configuration: chkconfig --list |grep jenkins
jenkins 0:off 1:off 2:off 3:on 4:off 5:on 6:off
Jenkins can now be access by a web browser: http://jenkins.megacorp.com:8080/
If you don't want users to access the Jenkins server directly but would rather that they access via an Apache web server at port 80 and use Apache authentication (e.g. LDAP, NIS, etc), route web traffic through the Apache server and use it as a proxy to access the Jenkins server.
- Note that the Jenkins port is specified in the configuration file /etc/sysconfig/jenkins
JENKINS_PORT="8080"
...
Defines default Jenkins port. - Proxy a URL path. Change the prefix Jenkins uses so that the default http://servername:8080/ can be accessed as http://servername:8080/jenkins
(Choose one method only, not both)- Set a /etc/sysconfig/jenkins variable (Red Hat/CentOS/AWS based systems). Default was "".
...
JENKINS_ARGS="--prefix=/jenkins"
Restart Jenkins: service jenkins restart
- Change the init script:
This is achieved by adding the command line argument --prefix=/jenkins to the init script PARMS variable and restart Jenkins.
Edit Jenkins init script: /etc/init.d/jenkins
From:PARAMS="--logfile=/var/log/jenkins/jenkins.log --daemon" ...
To:PARAMS="--logfile=/var/log/jenkins/jenkins.log --daemon --prefix=/jenkins" ...Restart Jenkins: /etc/init.d/jenkins restart
- Set a /etc/sysconfig/jenkins variable (Red Hat/CentOS/AWS based systems). Default was "".
- Configure Apache as a proxy to the Jenkins server service:
Allow mod_proxy- Ubuntu:
sudo apt-get install libapache2-mod-proxy-html
a2enmod proxy
a2enmod proxy_http
- Red Hat: file /etc/httpd/conf/httpd.conf
The default below remains as is:... LoadModule proxy_module modules/mod_proxy.so LoadModule proxy_http_module modules/mod_proxy_http.so
Create file:/etc/httpd/conf.d/jenkins.conf<IfModule mod_proxy.c> ProxyRequests Off <Proxy http://localhost:8080/jenkins*> Order deny,allow Allow from all </Proxy> ProxyPass /jenkins http://localhost:8080/jenkins ProxyPassReverse /jenkins http://localhost:8080/jenkins # <Location /jenkins/> # AuthType basic # AuthName "Jenkins" # AuthUserFile "/srv/passwd/.htpasswd" # </Location> </IfModule>
Restart web server: service httpd restart
or: apachectl restart - Ubuntu:
- Block external access to the Jenkins server on port 8080 (only localhost allowed) and only allow network proxy access through Apache on port 80 with the following firewall rules:
Add to end of /etc/rc.local so it executes upon system boot.
# Allow loopback access.
# Rule for your computer to be able to access itself via the loopback
# This rule must come before the rules denying port # access!!
iptables -A INPUT -i lo -p all -j ACCEPT
iptables -A OUTPUT -o lo -p all -j ACCEPT
iptables -A INPUT -p tcp -s 0/0 -d 0/0 --dport 8080 -j DROP
SELinux: setsebool -P httpd_can_network_connect true
- Jenkins can now be accessed with a web browser: http://jenkins.yourdomain.com/jenkins/
[Potential Pitfall]: The Apache httpd statement "ProxyRequests On" can cause all sorts of trouble on the public internet (don't use it) as it will allow your server to become an open proxy for all web traffic. If using this statement you must also restrict use as a proxy:
Limit proxy access to a specified IP address block:
<Proxy "*">
    Order deny,allow
    Deny from all
    Allow from XXX.XXX.XXX.XXX/14
</Proxy>
Jenkins can execute scripts, use Apache Ant or Maven build tools. In this example I am using Ant to launch a make file. Typical Java programmers will not need this example and will typically have projects which build with Ant or Maven. Projects based on Makefile builds (typical for C, C++, FORTRAN, etc) may want to use Apache Ant to call makefile targets as shown in this example.
Installation: (choose one option)
- Install binary tar ball:
cd /opt
wget http://mirrors.kahuki.com/apache/ant/binaries/apache-ant-1.8.0RC1-bin.tar.gz
tar xzf apache-ant-1.8.0RC1-bin.tar.gz - Use Red Hat Enterprise 5 YUM (Apache Ant 1.6): yum install ant
File: build.xml
<project name="projectX" default="jenkins" basedir=".">
    <description>
        Jenkins Ant file for projectX
    </description>
  <!-- set global properties for this build -->
  <property name="app" location="projectx"/>
  <property name="make.cmd" value="/usr/bin/make"/>
  <property name="build.native" value="./"/>

  <target name="init">
    <!-- Create the time stamp -->
    <tstamp/>
  </target>

  <target name="compile"
        description="compile the source" >
    <exec dir="${build.native}" executable="${make.cmd}" failonerror="true">
    </exec>
  </target>

  <target name="clean"
        description="clean up" >
    <exec dir="${build.native}" executable="${make.cmd}" failonerror="true">
    <arg value="clean"/>
    </exec>
  </target>

</project>
Links:
- Apache Ant home page
(Download: download) - Apache Ant manual
DOS commands to clean and build:
- devenv.exe projectX.sln /clean debug
- devenv.exe projectX.sln /build debug
Example CMD DOS command scripts to clean and build:
- prebuild.bat - clean
- rtlbuild.bat - compile
- postbuild.bat - test for executable
Environment variables for use with the MS/Visual Studio compiler can be found in:
- MS/Visual Studio .NET 2003: C:\Program Files\Microsoft Visual Studio .NET 2003\Common7\Tools\vsvars32.bat
- MS/Visual Studio 8.0: C:\Program Files\Microsoft Visual Studio 8\VC\vcvarsall.bat
Example of a build for embedded RTOS development using Wind River Workbench / VxWorks:
File: build.xml
<project name="Embedded VxWorks Build for ProjectE" default="jenkins" basedir=".">
    <description>
        Jenkins Ant file for Embedded VxWorks Build for ProjectE
    </description>
  <!-- set global properties for this build -->
  <property name="make.cmd" value="/opt/WindRiver/utilities-1.0/x86-linux2/bin/make"/>
  <property name="genmake.cmd" value="/opt/WindRiver/workbench-3.1/x86-linux2/bin/wrws_update.sh"/>
  <property name="build.native" value="./"/>
  <property environment="env"/>

  <target name="init">
    <!-- Create the time stamp -->
    <tstamp/>
  </target>

  <target name="genmake" description="Generate Makefile from .project file" >
    <exec dir="${build.native}" executable="${genmake.cmd}" failonerror="true">
    <arg line="-data /home/builds/jobs/ProjectE/workspace -l ProjectE -m"/>
    <env key="WIND_HOME" value="/opt/WindRiver"/>
    <env key="WIND_BASE" value="/opt/WindRiver/vxworks-6.7"/>
    <env key="PATH" value="/opt/WindRiver/diab/5.7.0.0/LINUX386/bin:${env.PATH}"/>
    <env key="LD_LIBRARY_PATH" value="/opt/WindRiver/vxworks-6.7/host/x86-linux2/lib:${env.LD_LIBRARY_PATH}"/>
    <env key="WIND_PLATFORM" value="vxworks-6.7"/>
    <env key="LM_LICENSE_FILE" value="/opt/WindRiver/license/zwrsLicense.lic"/>
    </exec>
  </target>

  <target name="compile" depends="genmake" description="compile the source" >
    <exec dir="${build.native}" executable="${make.cmd}" failonerror="true">
    <arg line="-f PPC604diab/Makefile clean main_all"/>
    <env key="WIND_HOME" value="/opt/WindRiver"/>
    <env key="WIND_BASE" value="/opt/WindRiver/vxworks-6.7"/>
    <env key="PATH" value="/opt/WindRiver/diab/5.7.0.0/LINUX386/bin:${env.PATH}"/>
    <env key="LD_LIBRARY_PATH" value="/opt/WindRiver/vxworks-6.7/host/x86-linux2/lib:${env.LD_LIBRARY_PATH}"/>
    <env key="WIND_PLATFORM" value="vxworks-6.7"/>
    <env key="LM_LICENSE_FILE" value="/opt/WindRiver/license/zwrsLicense.lic"/>
    </exec>
  </target>

</project>
This ANT build script first generates the Makefile from the Workbench GUI IDE project file. It then compiles the code using the Makefile.
This configuration is of Apache, Jenkins and the Wind River workbench compiler all running on Linux. (Note that the Windriver Workbench/VxWorks installation CDs contain both the Microsoft Windows and Linux installations on the same CD)
Use the "os" exec attribute to turn on an exec for only that platform. Thus all paths and platform dependencies within the exec statement will only get executed on the proper platform and ignored on all others.
The OS name can be determined by using
Include all platform execs within the same target.
Linux:
File snippet: build.xml
 <target name="run" description="Run application" depends="compile">
   <exec dir="${build.native}" executable="exampleapp" os="Linux" failonerror="true">
   </exec>
 </target>
MS/Windows:
File snippet: build.xml
 <target name="run" description="Run application" depends="compile">
    <!-- echoproperties / -->
    <exec dir="${build.native}" executable="cmd" os="Windows 7" failonerror="true">
      <arg value="/c"/>
      <arg value="exampleapp.exe"/>
    </exec>
  </target>
[Potential Pitfall]: Trying to execute a command directly rather than within a shell on MS/Windows may result in the following error:
    Execute failed: java.io.IOException: Cannot run program "..." (in directory "..."):
    CreateProcess error=2, The system cannot find the file specified
               at java.lang.ProcessBuilder.start(ProcessBuilder.java:1047)
               at java.lang.Runtime.exec(Runtime.java:617)
               at org.apache.tools.ant.taskdefs.Execute$Java13CommandLauncher.exec(Execute.java:827)
               at org.apache.tools.ant.taskdefs.Execute.launch(Execute.java:445)
               at org.apache.tools.ant.taskdefs.Execute.execute(Execute.java:459)
      ...
      ...
Fix: run the "cmd" shell with the executable as an argument to the shell and do not run the executable directly. This is a MS/Windows specific problem.
From the Jenkins web page: http://jenkins.megacorp.com/jenkins/
- Select "Manage Jenkins" (upper left)
(URL: http://jenkins.megacorp.com/jenkins/manage)
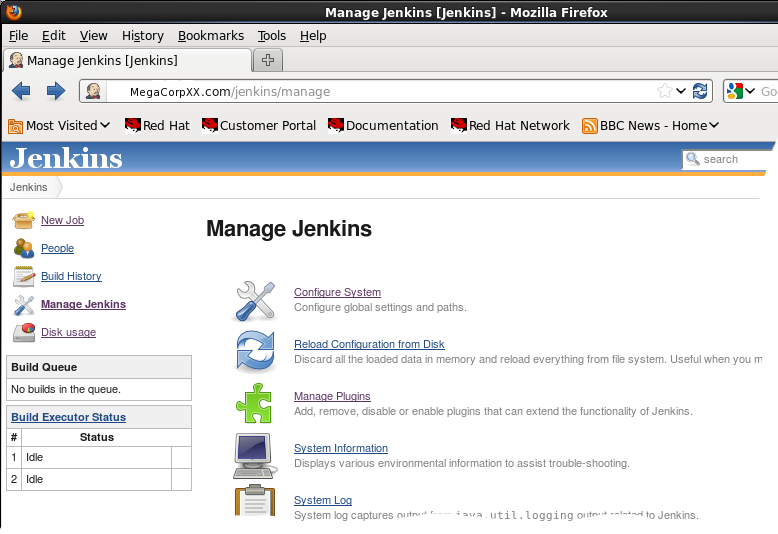
- Select "Configure System":
- Set Ant configuration:
Set default ANT and JDK Jenkins configuration
(URL: http://jenkins.megacorp.com/jenkins/configure)
Specify ANT_HOME path. When configuring a Jenkins project, you must not take the Ant (default) but must specify this version of Ant. Common Pitfall!
Can get error:FATAL: command execution failed.Maybe you need to configure the job to choose one of your Ant installations?
java.io.IOException: Cannot run program "ant" - Set "Global Properties" + "Environment variables" - List of key-value pair
Environment Variable Value ANT_HOME /opt/apache-ant-1.8.0RC1 PATH $ANT_HOME/bin:$PATH CLASSPATH /usr/java/latest/lib/tools.jar:./ - Subversion: Set URL to repository.
- Set Ant configuration:
- Select "create new jobs"
- Enter a job name and type ("Build a free-style software project" + OK
- Source Code Management:
- Subversion:
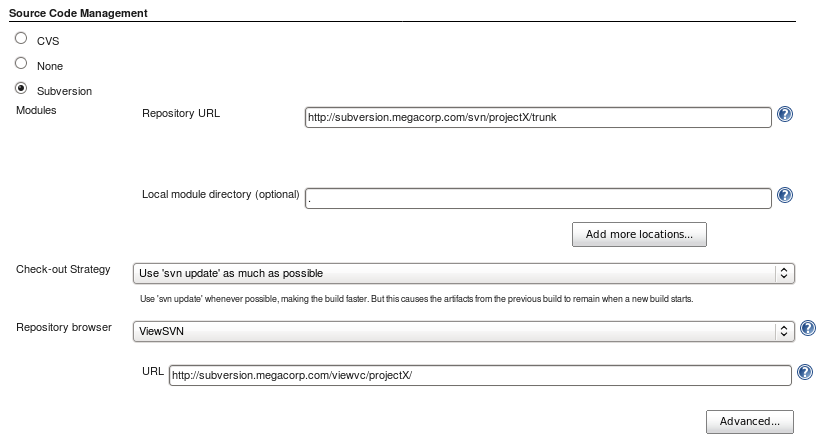 Select CM (i.e. Subversion). If Subversion then also enter the repository
URL: http//subversion.megacorp.com/svn/ProjectX/trunk/JavaApp
Select CM (i.e. Subversion). If Subversion then also enter the repository
URL: http//subversion.megacorp.com/svn/ProjectX/trunk/JavaApp
You will be prompted for authentication login/password if required.
Check "Use update" - GIT:
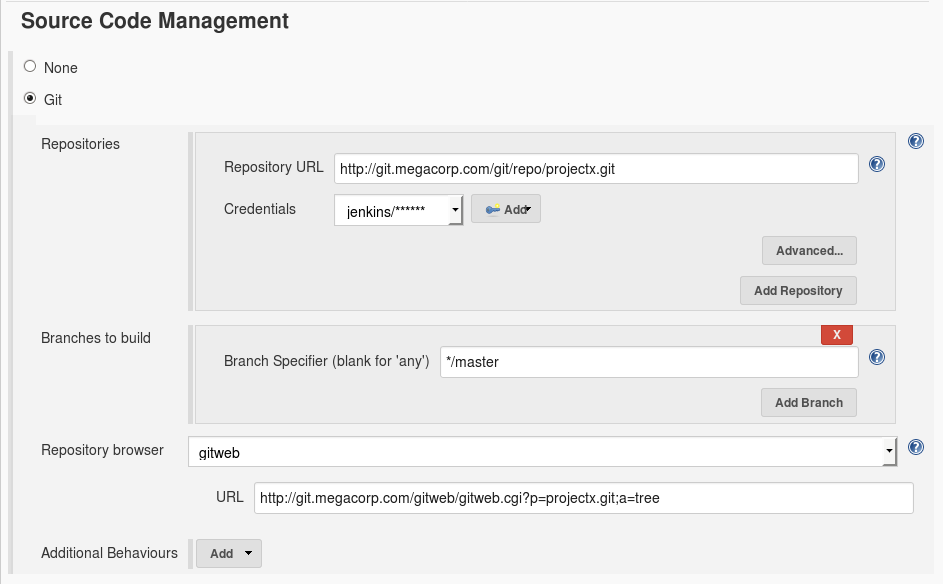
- Subversion:
- Build Triggers:
Select "Poll SCM" and define a schedule:Poll CM system (e.g. Subversion) every 6 minutes (10 times an hour) for updates.
*/6 * * * *This will detect changes checked into the CM system to trigger a new build.Chose a time which is greater than the time to update the local working Subversion repository, compile and run any regression tests. Configure to handle even the longest of JUnit or CppUnit tests.
Run build at 2:00am every Tuesday-Saturday
0 2 * * 2,3,4,5,6
is the same as:
0 2 * * 2-6
with a random number of minutes chosen:
H 2 * * 2,3,4,5,6
is the same as:
H 2 * * 2-6
This will run like a nightly build cron job.
Five Columns: MINUTE HOUR DOM MONTH DOW- MINUTE: Minutes within the hour (0–59)
- HOUR: The hour of the day (0–23)
- DOM: The day of the month (1–31)
- MONTH: The month (1–12)
- DOW: The day of the week (0–7) where 0 and 7 are Sunday.
- * specifies all valid values
- M-N specifies a range of values
- M-N/X or */X steps by intervals of X through the specified range or whole valid range
- A,B,...,Z enumerates multiple values
- H choose a random value. Good for avoiding conflicts. If "H 2 * * 2-6" is specified for all projects, the "H" will avoid the launching of multiple jobs all at once.
- Build:
Select from the pull-down list "Invoke Ant" and enter list of targets eg: clean and all - Unit Tests:
- Select "E-mail Notification" and enter email address.
(Make sure you are running an SMTP daemon: service sendmail start) - Select "Save"
Define list of build artifacts:
- From the Jenkins home page select the Job.
- From the upper left hand side of the page, select the "Configure" link.
- In the section "Post-build Actions" select the option "Archive the artifacts".
- Files to archive: name-your-executable-or-lib-here
(Comma separated list. Can use **/file.ext notation)
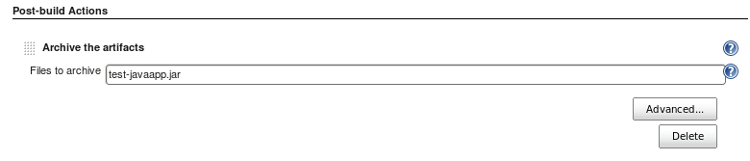
- After the next build, the project page will show the package icon and list the "Last Successful Artifacts" you specified.

Jenkins plug-ins are a way of extending and enhancing the capability of Jenkins. Many plug-ins provide an interface with other systems to provide improved integration. One of the wonderful features of Jenkins is the seamless integration of the plug-in installation: Jenkins (start page) + "Manage Jenkins" + "Manage Plugins". Now select the "Available" tab. From here you can select the plugin for Jenkins to download and install.
See the current list of Jenkins plug-insJenkins can download and manage plugins from the web console but the "hpi" plugin files can also be downloaded (Jenkins hpi plugins) independently and placed in the plugins directory: $JENKINS_HOME/plugins or /var/lib/jenkins/plugins/ (Red Hat: defines the environment variable JENKINS_HOME in /etc/sysconfig/jenkins) Note that this directory gets generated by Jenkins after first use when it starts up.
I do recommend some as part of any Jenkins installation, the Source Lines Of Code (SLOC) plugin "SLOCCount", "Sidebar-Link", Disk Usage and "Green Balls" plugins.
Plugins:- # Sidebar: Allow one to post links in the "side" bar.
- # SLOCCount: Post results from a run of the program "sloccount".
- # DRY: Don't Repeat Yourself: Code Duplication Detection
[Potential Pitfall]: Jenkins version 1.4xx requires Java 1.5 or newer. If running on a Solaris 8 platform you will be limited to Java 1.5 as your latest version. Note that some plugins are compiled with later versions of Java and may cause unexpected errors. A typical error is to make a call to an API method available with one version of Java (eg 1.6) but not the other (1.5).
Allows one to generate a list of extra links for Jenkins main page and view tabs. I use this to generate a link back to our CM server home page.
- Install Sidebar-Link plugin:
- Jenkins (start page) + "Manage Jenkins" + "Manage Plugins".
- Select the "Available" tab.
- Select plugin "Sidebar" (under the "User Interface" category) for installation.
- Then select the "Install" button at the bottom of the page.
- Configure Plug-in:
- After installing plug-in, go to your Jenkins home page and select "Manage Jenkins" + "Configure System".
- There will now be a new option category "Additional Sidebar Links".
- Select the button "Add Link" and specify the following:
- Link URL:
- Link Text:
- Link Icon:
Note: that an "Icon" specified as /userContent/ProjectX_logo_24x24.gif would reside in the local file system as $JENKINS_HOME/userContent/ProjectX_logo_24x24.gif (according to documentation) but found $JENKINS_HOME/war/images/24x24/ProjectX_logo_24x24.gif works where $JENKINS_HOME is defined in Jenkins configuration file /etc/sysconfig/jenkins
Also set: chown jenkins.jenkins /var/lib/jenkins/war/images/24x24/ProjectX_logo_24x24.gif
Note that icons in this directory can be identified by the file name without referencing the full path (Jenkins is aware of this icons directory).
- Select button "Save".
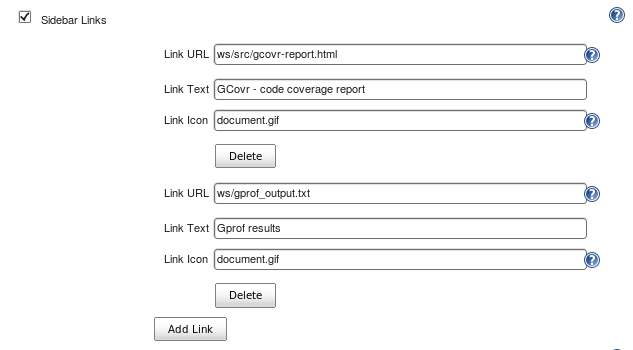
Example "sidebar links" to local report files in the Jenkins build workspace generated by gcovr and gprof. The Sidebar-Links plugin can link to anything including URLs of distant sites containing documentation or wikis.
This plugin will run the sloccount program against your code and report results through Jenkins.
- Install "sloccount":
- wget http://www.dwheeler.com/sloccount/sloccount-2.26.tar.gz
- tar xzf sloccount-2.26.tar.gz
- cd sloccount-2.26
- links sloccount.html
("q" to quit) Install info is at the bottom of the page. - vim makefile (or use your favorite editor)
- PREFIX=/opt/sloccount
- POSTED_DIR=/root/Admin/sloccount
- make
- mkdir -p /opt/sloccount/bin
- make install
# make
gcc -Wall c_count.c -o c_count
cp -p c_count java_count
gcc -Wall lexcount1.c -o lexcount1
flex -Cfe -t pascal_count.l > pascal_count.c
/bin/sh: flex: command not found
make: *** [pascal_count.c] Error 127
Solution to missing dependency:- Ubuntu/Debian: yum install flex
or - apt-get install flex
- Install SLOCCount plugin:
- Jenkins (start page) + "Manage Jenkins" + "Manage Plugins".
- Select the "Available" tab.
- Select plugin "SLOCCount" (under the "Build Reports" category) for installation.
- Then select the "Install" button at the bottom of the page.
- Configure Jenkins System:
After installing plug-in ad restarting Jenkins, go to your Jenkins home page and select "Manage Jenkins" + "Configure System".
(http://jenkins.megacorp.com/jenkins/configure)
In the section "Global Properties" + "Environment Variables", add to your PATH:- name: PATH
- value: $ANT_HOME/bin:/opt/sloccount/bin:$PATH
- Jenkins Project Configuration:
- Select your build job from the Jenkins home page.
- Select "Configure" (top left hand side of page)
- At the bottom of page under "Post-build Actions" select the "Publish SLOCCount analysis results " box.
- Set SLOCCount reports: **/sloccount.sc
(this is the default) - Select the "Save" button to save this configuration.

- Configure Build:
- Shell Script:
export PATH=$PATH:/opt/sloccount sloccount --wide --details src/ProjectX > sloccount.sc - Ant: Add target "sloccount"
(add to build.xml)-
File: build.xml
...
...
  <property name="basedir" value="./"/>

  <target name="sloccount"
          description="Source Lines Of Code count" >
    <delete file="${basedir}/sloccount.sc"/>
    <mkdir file="${basedir}/slocdata"/>
    <exec executable="/opt/sloccount/bin/sloccount"
          dir="${basedir}"
          output="sloccount.sc"
          failonerror="true">
       <arg line="--duplicates --wide --details --addlangall --datadir slocdata ."/>
       <env key="PATH" value="/opt/sloccount/bin:${env.PATH}"/>
    </exec>
  </target>

...
...
-
File: build.xml
- Shell Script:
- Sloccount Plugin Display:
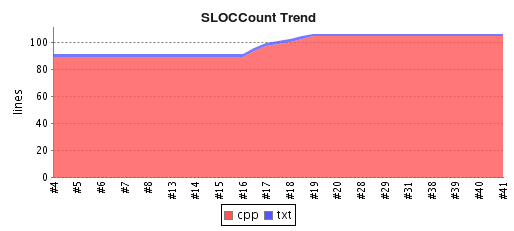
Select the graph and the detailed display will appear: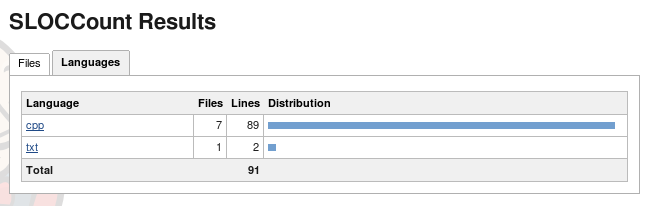
This is a plugin which reports the output from the PMD Cut and Paste Detector (CPD) which finds code duplication (comments and copyright headers not included). While the entire PMD suite of static code analysis applies only to Java, the CPD portion applies to Java, C, C++, C#, PHP, Ruby, Fortran and JavaScript.
- Install "PMD":
- Download pmd-bin-5.2.0.zip from the PMD homepage (or PMD GitHub repository)
- Install:
cd /opt
unzip pmd-bin-5.2.0.zip
This generates /opt/pmd-bin-5.2.0/... - For use by users (not just Jenkins), add to users ~/.bashrc
if [ -d /opt/pmd-bin-5.2.0/ ]
then
  for jarfile in /opt/pmd-bin-5.2.0/lib/*.jar; do
      CLASSPATH=$CLASSPATH:$jarfile
  done
  export CLASSPATH
fi
Command line use: /opt/pmd-bin-5.2.0/bin/run.sh cpd --files ./src --format xml --language cpp --minimum-tokens 100
This will run only the "cpd" (cut and paste detector)- --files: path to code
- --minimum-tokens The minimum token length which should be reported as a duplicate. Default: 0
- --language options: jsp, ecmascript, fortran, cpp, ruby, php, java, plsql, go, cs
- --format options:
- csv: provides a Comma Separated Values.
- text: provides a basic text output.
- xml: provides report output in XML format. For use with Jenkins.
- PMD CPD will require Java to be installed and configured.
See the YoLinux Java installation tutorial for more information.
[Potential Pitfall]: Version 5.2.0 works great. I tried a newer 5.2.3 and could not get it to work at all (with C++).
- Install Jenkins DRY plugin:
- Jenkins (start page) + "Manage Jenkins" + "Manage Plugins".
- Select the "Available" tab.
- Select plugin "DRY" for installation.
- Then select the "Install" button at the bottom of the page.
- Configure Jenkins System:
In the section "Global Properties" + "Environment Variables", add to your PATH:- name: JAVA_HOME
- value: /opt/java/latest
- name: PATH
- value: $JAVA_HOME/bin:$PATH
- Jenkins Project Configuration:
- Select your build job from the Jenkins home page.
- Select "Configure" (top left hand side of page)
- At the bottom of page under "Post-build Actions" select the "Publish duplicate code analysis results" option.
- Set results summary XML file: cpd_report.xml
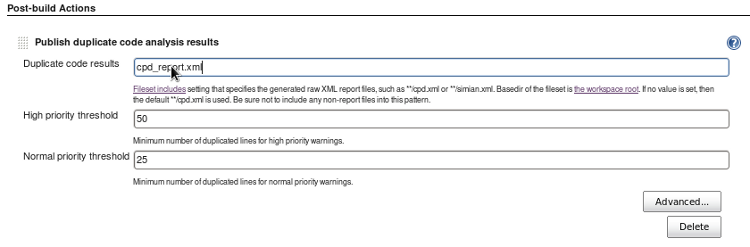
Basic Configuration

Advanced Configuration (extra options)
To add trend graph, select the advanced configuration button and select the link next to: "Trend Graph" with the text "You can define the default values for the trend graph in a separate view". This link will lead you to a page where you can select the graph type to plot. Select one. - Select the "Save" button to save this configuration.
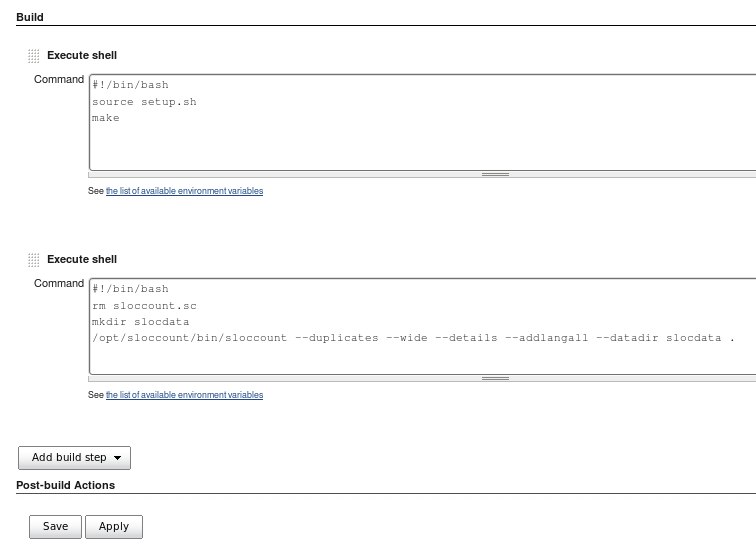
- Configure Build:
- Shell Script:
export PATH=$PATH:/opt/java/latest/bin /opt/pmd-bin-5.2.0/bin/run.sh cpd --files ./src --format xml --language cpp --minimum-tokens 100 - Ant: Add target "pmd" (add to build.xml)
For Java projects change the "fileset" includes to **/*.java... ... <property name="src.dir" value="./src"/> <property name="pmd.dir" value="/opt/pmd-bin-5.2.0"/> <property name="pmd.lib.dir" value="${pmd.dir}/lib"/> <property name="cpd.minimum.tokens" value="20"/> <property name="pmd.cpd.xsl.file" location="${pmd.dir}/cpdhtml.xslt" /> <property name="cpd.ignore.literals" value="true"/> <property name="cpd.ignore.identifiers" value="true"/> ... ... <path id="pmd.classpath"> <fileset dir="${pmd.lib.dir}"> <include name="*.jar"/> </fileset> </path> <target name="pmd" description="Code duplication report generation" > <taskdef name="cpd" classname="net.sourceforge.pmd.cpd.CPDTask" classpathref="pmd.classpath" /> <property name="cpd.report.xml" location="cpd_report.xml" /> <cpd minimumTokenCount="${cpd.minimum.tokens}" format="xml" outputFile="${cpd.report.xml}" ignoreLiterals="${cpd.ignore.literals}" ignoreIdentifiers="${cpd.ignore.identifiers}"> <fileset dir="${src.dir}" includes="**/*.cpp" /> </cpd> <xslt in="${cpd.report.xml}" style="${pmd.cpd.xsl.file}" out="cpd_report.html" /> </target> ... ...
The file /opt/pmd-bin-5.2.0/cpdhtml.xslt is not part of the download but can be downloaded independently from github: cpdhtml.xslt. - Shell Script:
- Build Display:
To add trend graph, select the advanced configuration button and select the link next to: "Trend Graph" with the text "You can define the default values for the trend graph in a separate view". This link will lead you to a page where you can select the graph type to plot. Select one. See the "Advanced" configuration screen shot above.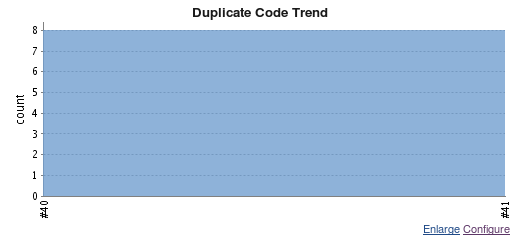
Select plot or sidelink to view details.
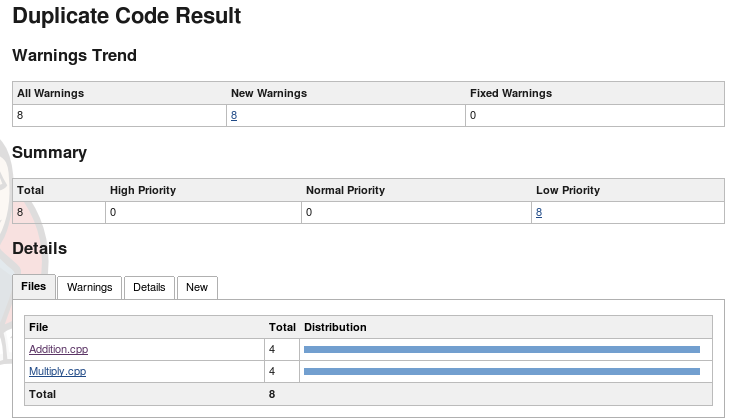
Duplicate code details.
Security can be handled by Apache authentication and authorization if proxied through Apache as detailed above or by Jenkins itself.
Turning on Jenkins security: Jenkins (home page/dashboard) +"Manage Jenkins" + Configure system"Options:
- Jenkins's own user database
- LDAP
- Delegate to servlet container
- Unix user/group database (PAM)
Authorization can also be handled by Jenkins options from nothing to setting fine grained Global or Project based authorization control.
Definitions:- Authentication: user proves that they are indeed who they say they are. Login and password required.
- Authorization: user is allowed (authorized) to perform certain functions and have specific access. eg. admin, read only, etc.
- Best Practices:
- Proxy Jenkins through the Apache web server on port 80 so that all web based tools authenticate through the same Apache authentication system and port (80). Very amateur configurations send you to ports like 8080, 8181, 9090 for each web application. Proxy all of them through port 80.
- Run the Jenkins-CI build server on the build platform (unless Java is not available like many embedded platforms). This will be self evident for unit test report generation which does not return through stdout/stdin. Jenkins is written in Java and will run on most platforms.
- Sidebar link plugin is very useful for making reports and results files available for viewing.
- Use Ant with build targets and not raw shell commands except in the simplest of configurations. It is easier to add/remove Ant targets at will. Ant is a build tool and comes with many useful options. Yes, it can be used to call make.
- Versions of plugins MUST match the Jenkins war file. Violate this and you will eventually get crashes -
- The config file /etc/sysconfig/jenkins defines the "JENKINS_HOME" directory under which all of the build jobs and configurations are stored.
- View Build Results: From the Jenkins web page http://jenkins.megacorp.com/jenkins/,
select the job and from the build history then select a build.
Feedback from the build is available from the left hand side link "Console Output". - Jenkins will perform a code checkout to $JENKINS_HOME/jobs/Jenkins/workplace/projectx
Where JENKINS_HOME is defined in /etc/sysconfig/jenkins - Jenkins build numbers do not necessarily match Subversion version numbers.
It may not be possible to synchronize Jenkins build numbers if more than one build is generated from the source repository.
For example, if Subversion has source control for four executables, then for each check-in and revision increment of Subversion, there may be no build, one build or more triggered in Jenkins.
- Look for errors in /var/log/jenkins.log
- Example shell execution:
- Jenkins architecture: Jenkins is a servlet written in Java and runs in the Winstone servlet engine.
- Jenkins updates: Jenkins will notify you of Jenkins software updates and allow you to download a new Jenkins WAR file. You will get an update message similar to the one below:

- Jenkins file and directory permissions: Updates and other functions may end in Java errors if directory ownership or permissions are not correct.
I got an error message during an upgrade which stated that the file /usr/lib/jenkins/jenkins.war.tmp could not be created. The fix is to make sure that the directory has the proper security settings. I run Jenkins under user "jenkins". My fix:
chown jenkins.jenkins /usr/lib/jenkins/ - Proxy server configuration:
Choose one option:- Add proxy configuration to bash shell environment:
Edit user "jenkins" bash shell configuration file: /var/lib/jenkins/.bashrcexport http_proxy=http://proxy.megacorp.com:80 ...Used by Jenkins and plugin updates. - Add proxy configuration to Jenkins configuration:
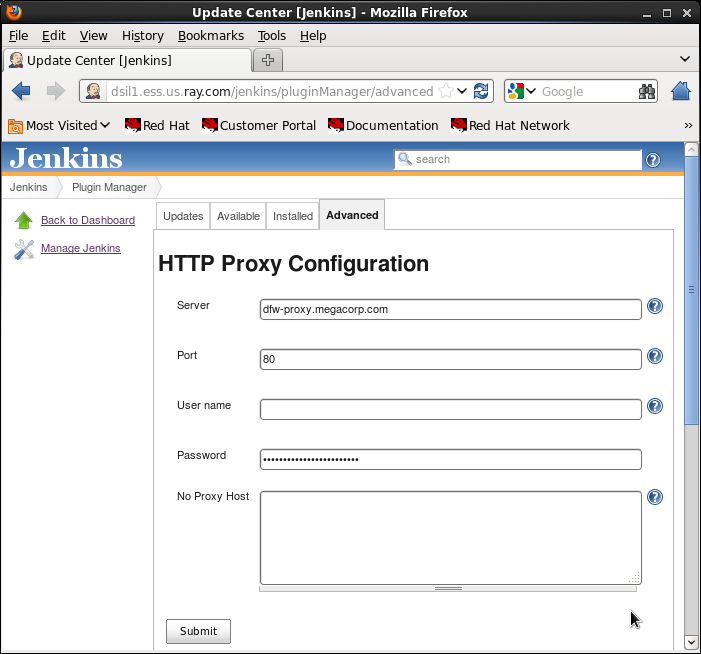
- Select "Jenkins" (Jenkins home) + "Manage Jenkins" + "Manage Plugins".
- Select the "Advanced" tab:
Server: http://proxy.megacorp.com
Port: 80
- Edit proxy configuration file:
- Look for definition of JENKINS_HOME in file /etc/sysconfig/jenkins
- Edit proxy setting is proxy config file: JENKINS_HOME/proxy.xml
- Add proxy configuration to bash shell environment:
- [Potential Pitfall]:
Running Jenkins on the same system with another servlet engine such as Tomcat or JBoss.
You may find that you get errors and experience TCP/IP port conflicts if you run Jenkins on the same platform as another servlet engine.
You will most probably experience conflicts on the HTTP or AJP ports.
The setting of the HTTP port is detailed above.
To turn off the AJP port, set it to "-1" by adding the following command line argument: --ajp13Port=-1 (-1: disable). To specify an AJP port just set it to the port value desired instead of "-1".
This command line argument can be set in /etc/sysconfig/jenkins-
Change from:
... JENKINS_ARGS=""To:... JENKINS_ARGS="--ajp13Port=-1"A full list of arguments can be found by issuing the following command:
java -jar /usr/lib/jenkins/jenkins.war --helpRestart Jenkins: /etc/init.d/jenkins restart
Verify the command: ps -auxw | grep jenkinsNote that the AJP port is used to connect the Apache web server with the servlet engine. If using AJP and you change the default AJP port, remember to set /etc/httpd/conf.d/proxy_ajp.conf to the new port number.
-
Change from:
- [Potential Pitfall]:
Port conflict on port 34377?
Jenkins can work as a cluster of build servers specialized for various platforms. They will communicate using JNL TCP/IP port 34377 (default setting)
If you are not using this master - slave cluster arrangement, turn it off:- Select the link "Jenkins" + "Configure System"
- Select the box "Enable security" category "TCP post for JNLP slave agents"
- Select the radio button "Disable"
- Select "Save" at the bottom of the page
- Continuous Integration requires a build/compile but is best if some sort of test is applied to verify the correctness of the code.
Many unit test frameworks are available to support unit tests.
See the YoLinux.com list of testing frameworks for C/C++ and Java
- Project configuration option: “Send separate e-mails to individuals who broke the build”.
Jenkins assumes that the user email addresses are the CM (eg Subversion) "user-id" + a specified suffix (eg @megacorp.com).
If this is not the case try using the Jenkins LDAP plugin where Jenkins will pull the correct email address from LDAP.
Another option is to set up Postfix to forward Jenkins generated localhost emails to their corporate accounts.
The Postfix virtual users can have forwarding email addresses to their corporate email addresses.
Jenkins provides a number of environment variables which can be used by your build tools (eg Ant or Maven)
| Environment Variable | Description |
|---|---|
| BUILD_NUMBER | The current build number, such as "153" |
| BUILD_ID | The current build id, such as "2005-08-22_23-59-59" (YYYY-MM-DD_hh-mm-ss, defunct since version 1.597) |
| BUILD_URL | The URL where the results of this build can be found (e.g. http://buildserver/jenkins/job/MyJobName/666/) |
| NODE_NAME | The name of the node the current build is running on. Equals 'master' for master node. |
| JOB_NAME | Name of the project of this build. This is the name you gave your job when you first set it up. It's the third column of the Jenkins Dashboard main page. |
| BUILD_TAG | String of jenkins-${JOB_NAME}-${BUILD_NUMBER}. Convenient to put into a resource file, a jar file, etc for easier identification. |
| GIT_COMMIT | For Git-based projects, this variable contains the Git hash of the commit checked out for the build (like ce9a3c1404e8c91be604088670e93434c4253f03) (all the GIT_* variables require git plugin) |
| GIT_URL | For Git-based projects, this variable contains the Git url (like git@github.com:user/repo.git or [https://github.com/user/repo.git]) |
| GIT_BRANCH | For Git-based projects, this variable contains the Git branch that was checked out for the build (normally origin/master) |
The environment variables can then be referenced in build tools like Apache Ant or Maven.
Maven example:
     <profiles>
        <profile>
            <id>jenkins-build</id>
            <activation>
                <property>
                    <name>env.BUILD_NUMBER</name>
                </property>
            </activation>
            <properties>
                <release.jenkins.version>${env.BUILD_NUMBER}</release.jenkins.version>
            </properties>
        </profile>
    </profiles>
The default for when the maven build is not using Jenkins, the build number is set to "local":
<properties>
<release.jenkins.version>local</release.jenkins.version>
The artifact names can be appended with -${env.BUILD_NUMBER} Version numbers can also be set to build numbers as well.
Also see the Jenkins website list of environment variables.
- Jenkins Home Page
- Jenkins plugins and tools for Java
- Jenkins plugins and tools for C++
- Google C++ Unit Test - C++ unit test
- CppUnit - C++ unit test
 Books:
 |
Continuous Integration: Improving Software Quality and Reducing Risk
(Paperback) by Steve Matyas, Andrew Glover Addison-Wesley Professional
|

|
 |
Jenkins: The Definitive Guide
(Paperback) by John Ferguson Smart O'Reilly Media (July 27, 2011) Java development focus. |
|
 |
Better Software Magazine
Free subscription for software professionals who care about quality. Each issue brings you relevant, timely information to help you build better software. Continuing to deliver in-depth articles on testing, tools, defect tracking, metrics, and management. |
Free Subscription |